Building Hybrid Mobile Apps with React Native: A Complete Guide

Siloed development teams, fragmented code, and the relentless pressure to keep pace with two distinct platforms—these realities have long affected mobile app development. However, with platforms like React Native, developers have a robust solution for building cross-platform apps with native-like features, offering consistent UI/UX across Android and iOS.
Its “write-once, deploy everywhere” methodology has enabled all businesses, from startups to established enterprises, to maintain and refine a unified codebase for their apps. The impact? Reduced development costs, faster market entry, increased agility, and streamlined future updates & maintenance. This write-up will dig into the process of building cross-platform applications with React Native, exploring the key steps and best practices for successful implementation.
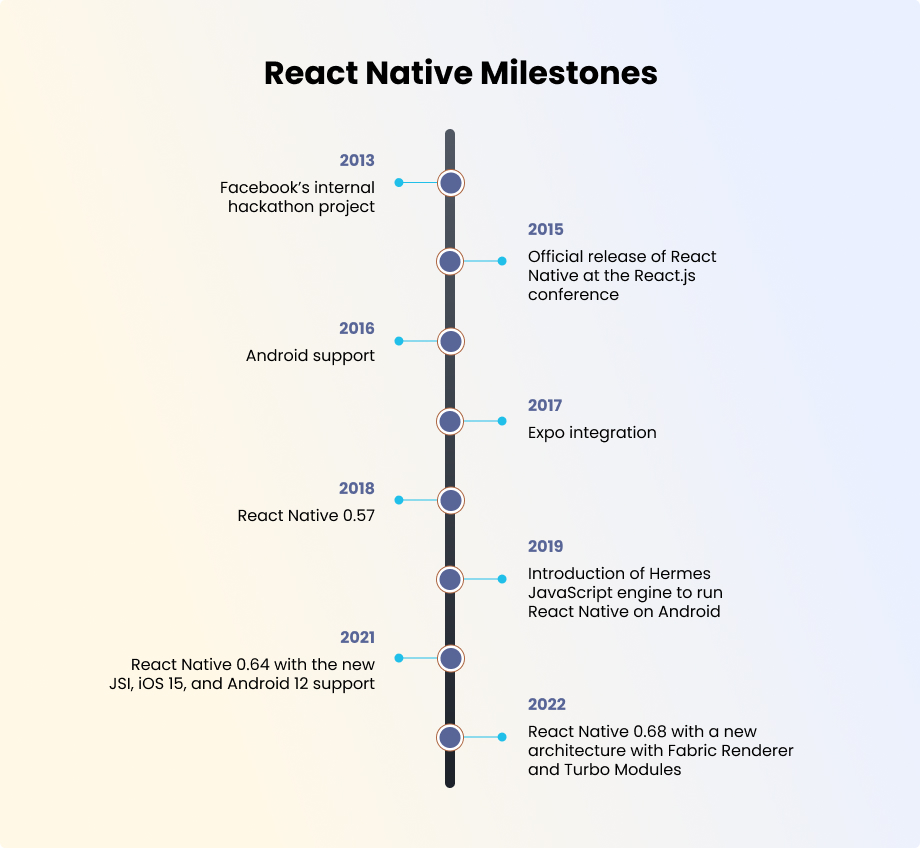
However, before we dive into the implementation, it’s worth recalling how React Native evolved into the powerful framework it is today. From its internal use at Facebook to becoming a go-to cross-platform solution for global brands, React Native’s journey has been nothing less than remarkable.
How to Build an App with React Native?
Follow the steps below to build cross-platform mobile apps with React Native:
1. Set up your Development Environment
Decide on all tools and dependencies before you start developing your cross-platform app with React Native. This includes:
- Installing the latest version of Node.js.
- Install React Native CLI or the Expo CLI.
- You can also install Watchman to keep track of changes in your file system.
- Install Xcode for macOS and Android Studio for Android development.
2. Create a New React Native Project
Once the environment is set up, create a new React Native project.
- Open your terminal and head over to the directory where you want to create your project. Use the npx react-native init MyNewApp command to create a folder named MyNewApp. This folder will contain the basic boilerplate code for your project.
3. Run the App
Once the project is created, test-run its default app template on both Android and iOS.
Note: Make sure you understand how projects are stored in React Native. Here is a brief overview:
- /android: Contains Android-specific configuration files and code.
- /ios: Contains iOS-specific configuration files and code.
- /node_modules: The dependencies required by the project.
- /src (optional): You can create this folder to organize your app’s components and other code.
- App.js: The main entry point of your application.
4. Build your React Native App’s UI
Start editing the App.js file to customize the app and build your UI with desired features. React Native provides several components (similar to React Components but more suited for mobile app development), including:
- View: It is essentially a container for other components (texts, buttons, etc.) and is used to manage the layout of your React Native app. It’s also utilized to apply background colors, borders, padding, margins, and borders to create sections within your app.
- Text: It is used for styling the displayed text with properties like fontSize, fontWeight, lineHeight, color, textAlign, and letterSpacing. You can also add interactive text elements that can open a link or trigger an action when pressed, e.g., creating clickable hyperlinks.
- Image: It supports static image files or dynamic content (URLs or assets). This component can also display a placeholder image while loading, and handle errors when the image cannot be loaded (useful for network images).
- TextInput: It is used to provide a placeholder text for input fields, such as the keyboard that appears when the cursor is focused on it. You can also configure it to secure sensitive inputs like passwords and also control the maximum number of characters in any input.
- Button: It is used to customize button text style, such as color, font size, and font weight. You can integrate icons within the buttons, add feedback to button presses (navigating to another screen, submitting a form, or triggering an API call), and trigger certain actions when a button is pressed.
- FlatList: Use FlatList to render long lists of data efficiently, only rendering items that are currently visible on the screen. You can implement infinite scrolling and pull-to-refresh functionality and customize the rendering of each list item.
5. Integrate Additional Libraries and Add Styles
To extend the functionality of your app, you can install third-party libraries using npm install or yarn. Once you have reached the desired level of customization, start styling the app using StyleSheet. It’s similar to CSS, however, with some minor syntax variations.
6. Set up React Navigation for Mobile Optimization
Use React Navigation to configure smooth transitions between screens. You can install it using npm install @react-navigation/native and the Stack Navigator using npm install @react-navigation/stack. After setting it up, configure your custom navigation system.
7. Configure Application State Management
There are two ways to optimize state management in React Native apps:
- Using React Hooks
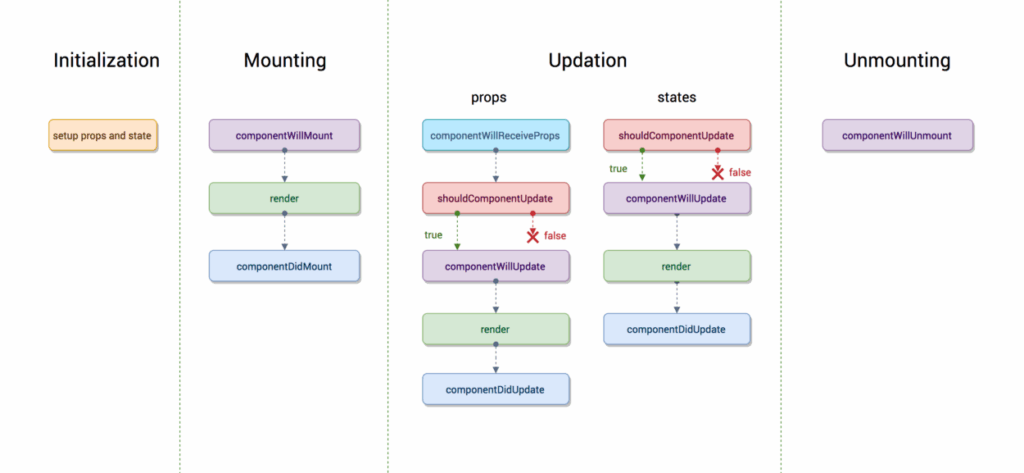
Hooks are a dedicated feature that allows you to use other applications within functional components, especially those that are not shared across multiple components.
Here is how you can get started with React Hooks:
1. Start by initializing hooks with useState with a default value (often “false”). The hook returns an array containing the current state value and a function to update it. So, when an event occurs (e.g., a button press), you call the setter function to update the state, which triggers a re-render of the component. Here’s how you initialize it:

2. Extend React Hooks’s functionality using useReducer. With this, instead of calling a setter function, you can directly dispatch actions that describe how the state should change. This is done by defining an initial state and a reducer function to update that state. Here is how to do it:
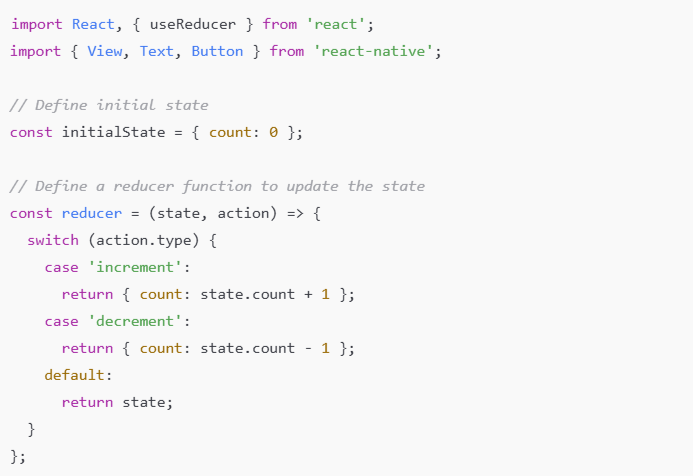
Initializing state with useReducer:
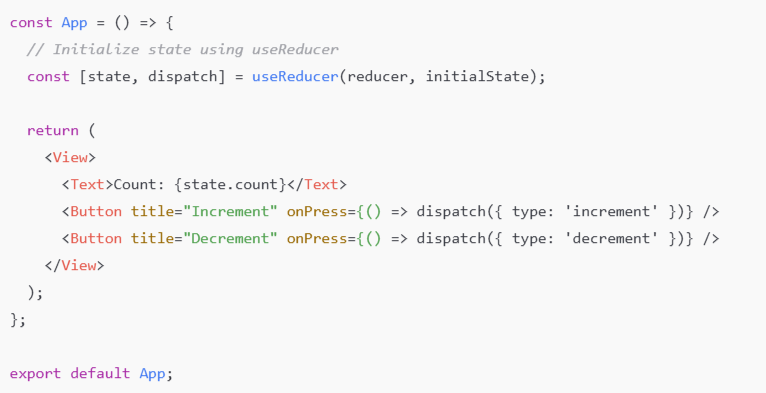
Here is a visual representation of the entire React Hooks workflow:
- Using Redux
Redux is a state management library commonly used in React and React Native apps, especially when the app requires managing state that is shared across multiple components. It provides a centralized store where the app’s state is stored and uses actions to describe state changes and reducers to specify how it should be updated.
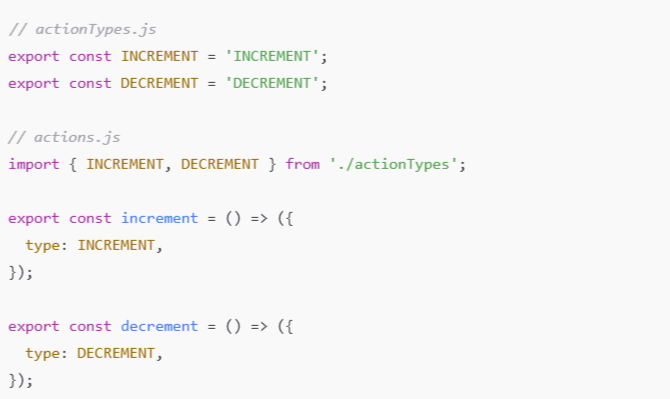
1. Creating Redux Actions (Types and Creators)
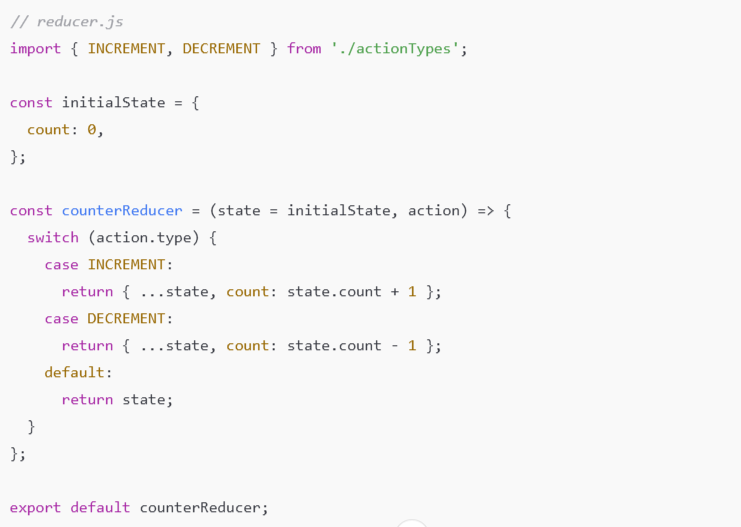
2. Creating Reducer
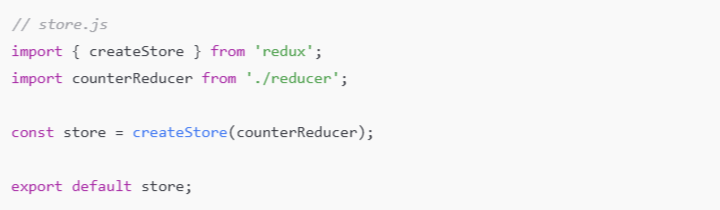
3. Creating Redux Store
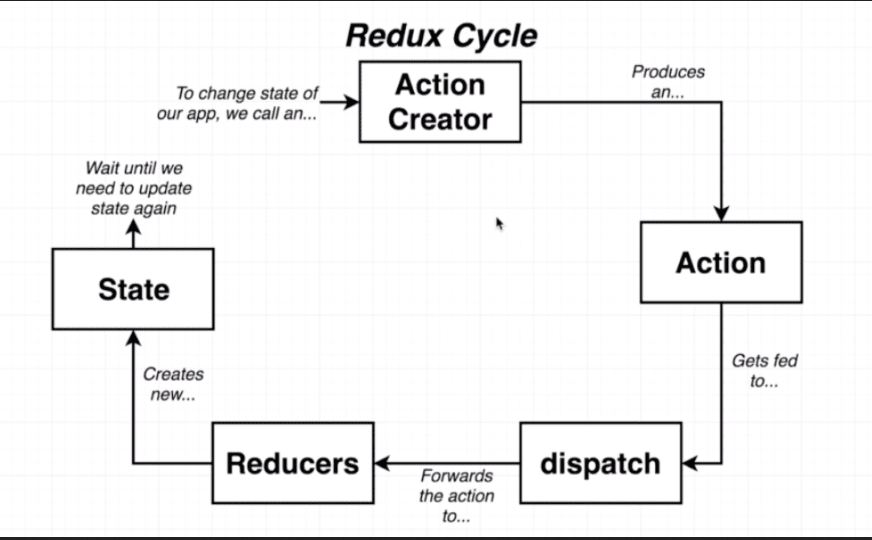
Here is a visual description of Redux cycles:
8. Prepare for Deployment
When your React Native app is ready to release, follow the steps to build and release it for production.
For Android:
- Open the project in Android Studio and configure your release key.
- Run the build command:
- cd android
- ./gradlew assembleRelease
For iOS:
- Use Xcode to set up your release profile.
- Open MyApp.xcworkspace.
- In the Xcode toolbar, ensure that the Build Configuration is set to Release.
The Realities of React Native App Development
As evident from the process above, developing a React Native app is a time-consuming, complex journey that requires a deep understanding of both JavaScript and the intricacies of mobile development. Each step demands careful attention, from setting up your development environment and managing dependencies to designing an efficient UI.
Moreover, integrating and configuring third-party services while ensuring cross-platform compatibility requires expertise and technical proficiency. The process does not end with development and optimization; even deployment and distribution, such as configuring release profiles, complying with app store/play store requirements, and managing continuous updates, can add another layer of complexity.
Consequently, many businesses turn to professional React Native experts who can handle and streamline the process.

The Impact of Professional Development: How React Native Experts Streamline the Process
1. Efficient Cross-Platform Codebase Management
Working with React Native experts simplifies codebase management. Their understanding of platform-specific requirements allows them to create native-like experiences while minimizing the need for duplicate code for iOS and Android.
They’re also familiar with React Native best practices, modularizing, and structuring code into segments to reduce dependencies and avoid any unnecessary bloat. As a result, you get a clean and maintainable codebase.
2. Faster Iterations and Updates
Expert React Native developers can streamline iterations and updates with their agility. They are highly professional and know how to meet deadlines, even under pressure. Moreover, they can set up CI/CD pipelines to automate this process and enable frequent updates.
3. Better Debugging and Testing
React Native experts are proficient in using React Native Debugger, Flipper, and Chrome DevTools to identify and resolve issues. They follow a balanced approach to testing, combining both automated testing (performance, unit, security, and integration) and manual testing strategies (for UI/UX consistency, accessibility, and edge cases) to ensure that no vulnerabilities or inefficiencies are overlooked.
4. Platform-Specific Customization
While the platform unifies your app’s codebase, React Native experts excel at implementing platform-specific customizations. For instance, they can configure iOS-specific navigation using react-navigation with some additional header configurations or customize Android’s back button behavior. Alternatively, they can optimize native modules, such as iOS’s Core Location or Android’s Bluetooth API, according to your app’s requirements.
5. Code Quality Management and Documentation
With professional React Native development, you also get to benefit from stringent code quality management practices. The experts utilize industry-standard tools for code linting, testing, and version control (such as ESLint, Prettier, and Git), and prioritize thorough documentation to simplify long-term maintenance and future updates.
Ready to Build your React Native App?
With a solid JavaScript core, countless libraries, and support for mobile optimization, React Native has emerged as a trusted platform for building cross-platform mobile apps. However, to truly make the process more efficient and adhere to all coding best practices, you need experts who bring in-depth knowledge and industry-wide experience.
This expertise can be accessed either by hiring React Native app developers internally or outsourcing React Native development services. With the proper support, it translates to faster iterations, robust debugging, and ultimately, a more efficient and effective development process, regardless of your approach. So don’t wait; start building with React Native today. With this platform, you’re building more than just an app; you’re creating a scalable, maintainable, and well-architected solution.
At SunTec, we have a vetted pool of React Native developers, each averaging more than 6 years of focused development experience. Whether it’s AI integration or native module development, our experts can deliver precisely what you need. Contact us at info@suntecindia.com to find a match in < 48 hrs.
Frequently Asked Questions
1. Why should you choose React Native over other cross-platform frameworks?
When building hybrid mobile apps, it’s essential to evaluate React Native against other popular frameworks, such as Flutter and Xamarin.
- React Native has been on the market longer and boasts a more mature ecosystem, while Flutter, developed by Google, offers high performance and flexibility, but requires learning the Dart programming language.
- Xamarin is a .NET-based framework that allows sharing code across platforms, but it has a steeper learning curve compared to React Native, especially for teams already familiar with JavaScript.
2. How long does it take to develop an app using React Native?
The development time can vary depending on the complexity of the app, but React Native allows for a faster time-to-market due to its shared codebase. A basic app may take between 2 to 4 months, while more complex apps may take longer.
3. Is React Native suitable for large-scale enterprise applications?
Yes, React Native can handle large-scale apps, particularly when businesses prioritize cross-platform compatibility. However, for highly complex apps or apps requiring intensive computation, you may need to integrate some native code.
4. How does React Native handle updates to iOS and Android?
React Native is continually updated to support new versions of iOS and Android. Developers can also utilize the Over-The-Air (OTA) update feature to push updates directly to users, eliminating the need for app store approval.
5. What types of apps are best suited for React Native development?
React Native is ideal for apps that require cross-platform support and rich user interaction. Typical applications include eCommerce apps, social networking apps, productivity tools, and media streaming apps. It’s best suited for businesses that want to deliver a consistent user experience across multiple platforms without the overhead of separate development for each one.
The SunTec India Blog
Brought to you by the Marketing & Communications Team at SunTec India. We love sharing interesting stories and informed opinions about data, eCommerce, digital marketing and analytics, app development and other technological advancements.